Frequently Asked Questions
General information
Playlisty 101: How do I import a playlist using Playlisty?
Example 1: Import a Spotify Playlist to Apple Music using “Playlisty for Apple Music”
Once Playlisty is installed, it’s basically 4 taps / clicks of your mouse to import a playlist. You can tap here to view a YouTube video of the process on an iPhone, or you can see the individual steps here:
- Install “Playlisty for Apple Music” on your device and be sure to link your Spotify account during the setup process.
- Tap where it says “Spotify Library” (on a Mac or iPad it’s on the side bar; on an iPhone it’s on the “Sources” tab). You should now see all your Spotify playlists. If you don’t, you probably signed-in to the wrong Spotify account (we’ve done it a million times and it’s easy to fix: just sign-out of Spotify on the Settings tab and sign-in again using the right details).
- Tap on the playlist you want to import. Playlisty will go through a matching process where it finds the Apple Music version of each of your tracks. To learn more about Playlisty matching, look here. To import several playlists in one go tap the “Select” button on an iPhone or the “Select multiple playlists” menu option on an iPad or Mac.
- Check the matches look good. Hint: if you tap on the red traffic light it will filter your view to show only the tracks which Playlisty couldn’t match (hopefully none!). You can fix mismatches at this point by tapping on a track and then selecting an alternative.
- Tap the “Save to your library” button, make sure you’re on the “Save to a new playlist” tab and then tap “Start”.
- Wait a few seconds for Playlisty to finish uploading your playlist to the Apple Music cloud.
- Check your playlist arrived in Apple Music, here: https://music.apple.com. It should appear in your Music app shortly after, but if it doesn’t take a look at this page.
Example 2: Import an Apple Music Playlist to Spotify using “Playlisty for Spotify”
The process of importing an Apple Music playlist to Spotify using “Playlisty for Spotify” is extremely simple. Here it is, step by step:
- Install “Playlisty for Spotify” on your device and be sure to link your Apple Music account during the setup process. If you have any problems linking to Spotify, take a look here.
- Tap where it says “Music Library” (on a Mac or iPad it’s on the side bar; on an iPhone it’s on the “Sources” tab). You should now see all your Apple Music playlists.
- Tap on the playlist you want to import. Playlisty will go through a matching process where it finds the Spotify version of each of your tracks. To import several playlists in one go tap the “Select” button on an iPhone or the “Select multiple playlists” menu option on an iPad or Mac.
- Check the matches look good. Tap on the red traffic light to filter your view to show only the tracks which Playlisty couldn’t match (hopefully none!). You can fix mismatches at this point by tapping on a track and then selecting an alternative.
- Tap the “Save to your library” button, make sure you’re on the “Save to a new playlist” tab and then tap “Start”.
- Wait a few seconds for Playlisty to finish uploading your playlist to Spotify.
- Check your playlist arrived in Spotify by either opening the Spotify app or by looking at https://open.spotify.com.
What does Playlisty “Pro” include?
Playlisty “Pro” is a low cost in-app purchase that unlocks all of Playlisty’s “Pro” features. You can purchase “Pro” either from the playlist “Save” screen or from the “Settings” screen.
Many features in Playlisty do not need “Pro”. For example, you can browse and import set lists for your favourite artists on Setlist.fm without any restrictions, 100% free.
The tables below details the additional features available in “Pro”. Playlisty “Pro” is available in 2 separate versions – one for Apple Music users and one for Spotify users:
Playlisty Pro for Apple Music
| Feature | Playlisty Standard | Playlisty Pro for Apple Music |
| Cost | Free | $3.99 (or local equivalent) |
| License duration | Lifetime | Lifetime |
| Platforms included | iPhone, iPad, Mac | iPhone, iPad, Mac |
| Maximum playlist imports | Unlimited | Unlimited |
| Maximum items per import | 20 tracks or Unlimited1 | Unlimited |
| Create new playlists | Yes | Yes |
| Copy favourite songs | Yes4 – to a playlist only | Yes2 |
| Copy favourite albums | Yes4 – to a playlist only | Yes2 |
| Copy favourite artists | No | Yes |
| Add tracks to existing playlists | No | Yes |
| Add tracks directly to your library | No | Yes |
| Mirror playlists, including adds, deletes & order | No | Yes3 |
| Backup playlists to a file | Yes4 | Yes |
| Import multiple playlists at once | Yes4 | Yes |
| Copy playlist descriptions | No – uses a default description | Yes |
| Single click creation of Siri Shortcuts | No | Yes |
1 In the standard version of Playlisty the following sources allow imports of unlimited length: Setlist.fm. The following are restricted to the first 20 tracks of each playlist: Apple Music, Spotify, YouTube, Deezer, Last.fm, Soundcloud. Other sources not listed above may vary – please download & run the app to see which restrictions apply in the latest version.
2 Requires “Favourites” to be enabled in settings. Where available on the source service you can copy your “liked” songs & albums to a playlist, your library or to your favourites. If you transfer songs to a playlist or favourites (aka “Favourite Songs”) then the order of your tracks will be preserved.
3 Mirroring playlists requires “Replace Mode” to be enabled and is currently only available on iOS & iPadOS devices (not macOS)
4 Subject to the 20 tracks-per-playlist limit
Playlisty Pro for Spotify
| Feature | Playlisty Standard | Playlisty Pro for Spotify |
| Cost | Free | $3.99 (or local equivalent) |
| License duration | Lifetime | Lifetime |
| Platforms included | iPhone, iPad, Mac | iPhone, iPad, Mac |
| Maximum playlist imports | Unlimited | Unlimited |
| Maximum items per import | 20 tracks or Unlimited1 | Unlimited |
| Create new playlists | Yes3 | Yes |
| Copy favourite songs | Yes3 – to a playlist only | Yes2 |
| Copy favourite albums | Yes3 – to a playlist only | Yes2 |
| Copy favourite artists | No | Yes2 |
| Add tracks to existing playlists | No | Yes |
| Mirror playlists, including adds, deletes & order | No | Yes |
| Backup playlists to a file | Yes3 | Yes |
| Import multiple playlists at once | Yes3 | Yes |
| Copy playlist descriptions | No – uses a default description | Yes |
| Single click creation of Siri Shortcuts | No | Yes |
1 In the standard version of Playlisty the following sources allow imports of unlimited length: Setlist.fm. The following are restricted to the first 20 tracks of each playlist: Apple Music, Spotify, YouTube, Deezer, Last.fm, Soundcloud. Other sources not listed above may vary – please download & run the free app to see whether restrictions apply.
2 Where “favourites” are available on the source service they can be copied direct to your Spotify library. Please download & run the latest free version of Playlisty to see which “favourites” are currently available for the service you wish to import from.
3 Subject to the 20 tracks-per-playlist limit
Does Playlisty support Apple’s “Family Sharing”?
Yes! Family Sharing is enabled for Playlisty Pro.
You can verify this for any app by looking at it in the App Store, in the “Supports” section. In actual fact there’s nothing the app itself needs to do to support this – it’s just a switch that we (the developers) set on the app’s App Store definition.
If it’s not working for you (and it can be a bit hit and miss) then it might be worth looking at this Apple support page before calling Apple.
How do I cancel my Playlisty Pro subscription?
There’s no subscription for Playlisty Pro – it’s a one-off payment. So there’s nothing to cancel.
We don’t like subscriptions ourselves and don’t think they make sense for products like ours.
About artwork
We understand that many of our customers invest a lot of time and effort in their playlists and that includes the artwork, not just the tunes. By artwork, we mean both the “sleeve” artwork of the individual tracks and the image attached to a playlist as a whole.
Retaining artwork when moving playlists between platforms throws up some significant technical challenges. We’ve invested much time and effort trying to ensure that Playlisty gives you the best possible experience, read on if you’d like to learn more.
Track Artwork
Let’s say (like us) you’ve spent many hours creating a playlist on Spotify getting everything just right. And by just right we don’t just mean the right tracks in the right order, we mean that when you selected New Order’s “Blue Monday” you didn’t just pick the first mix you came to but instead carefully picked the one with the “correct” floppy disk cover art.
Let’s say you’ve then used a tool to copy that playlist over to Apple Music and your Blue Monday artwork gets translated to a fluorescent “Best of the 80’s” album cover. You’d be disappointed, right?
Well over the last year we’ve invested a lot of time & effort in Playlisty trying to keep that kind of disappointment to a minimum. Here’s how:
- First of all, with Playlisty you can match using the album or EP (which is usually associated with artwork) as well as the track itself. So when you match with (say) Spotify you can ensure you are getting the same track from the same album, not just the same track.
- If an album or EP isn’t available to match against but there are still a number of different covers for Playlisty to choose from, Playlisty uses a complex algorithm to try to ensure you get the “best” artwork. Starting with Playlisty 3.2 we give you control over this algorithm so that, as far as is possible, you get the artwork (or audio quality) you want. To learn about the algorithm control features in Playlisty 3.2 click here.
- Regardless of what settings you choose, when matching we ALWAYS try to avoid “best of” albums and compilation albums. We always try to pick singles or original artist albums where available and where the metadata allows us to identify them.
- Sometimes things will still look odd, often because (Spotify, we’re looking at you) we get given the “wrong” album by a music service. We try to correct these situations where possible, so if (for example) there are 5 tracks from album A and 1 track from album B even though that track was also available on album A, we’ll use the album A version instead.
Having said all of this there are some caveats which are worth bearing in mind:
- Playlisty will NEVER swap one track for another for the purposes of optimising artwork if it will result in a different audio file, so your playlist will always sound as it should. The music always takes priority.
- Remember that sometimes the exact track you want just isn’t there in Apple Music or the metadata associated with a track is not good enough for Playlisty to find it. In those situations there’s only so much that Playlisty can do.
Playlist Artwork
Unfortunately Apple don’t currently provide any means for apps such as Playlisty to associate artwork with a playlist in Apple Music. Technically it’s just not possible: the only way to associate artwork with your playlists is by using the iOS or macOS “Music” app.
However, we’ve done what we can to make the manual process of moving artwork from one service to another as easy as possible.
Specifically, while you are in the Library view in Playlisty, you can long-press on playlist artwork and Playlisty will give you the option to save the artwork straight to your photo album.
It’s then easy to pick this from your photo album when adding artwork to a playlist within the “Music” app.
It’s a bit clunky but until Apple give us an API for artwork we’re afraid it’s the best we can do!
How can I keep the order when importing Spotify “Liked Songs” to Apple Music “Songs”?
We get asked this a lot by people migrating from Spotify to Apple Music.
Short answer: You can’t. If you want to keep the order you must use a playlist.
Long answer: You’re asking the wrong question!
Unsurprisingly a lot of new Apple Music users assume that the Songs section of their Apple Music library is equivalent to the “Liked Songs” section of Spotify. Because people spend a lot of time on their Liked Songs list and want that replicated in Apple Music, keeping the order is a natural thing to ask for.
Unfortunately the Songs section in Apple Music is not remotely the same thing as Liked Songs in Spotify. It’s simply a song by song view of everything in your library including albums and potentially playlist tracks. It has no inherent order (it’s a view on a database) but you can apply a sort to it, if you so wish. It’s actually a hangover from iTunes, circa 2002.
To be clear: once you’ve been using Apple Music for a short while that “Songs” view will become a dumpster fire of seemingly random tracks. You can minimise this by turning off “Add playlist songs” and “Add favourite songs” in Settings (everyone we know does this) but every track from every album you add to your library will still appear in that Songs list. It will never be the nice, clean view of your favourite tracks that you had on Spotify.
The right question to ask is: Can Playlisty add my Spotify “Liked Songs” to Apple Music’s “Favourite Songs”?
The Apple Music “Favourite Songs” playlist is the closest equivalent to Spotify “Liked Songs” and it does retain the order of your tracks. And the answer is “yes”: starting with versions 3.29, Playlisty includes this ability as an “experimental” feature (disabled by default).
To enable this feature, head over to “Settings”, scroll to the bottom and tap on “Experimental Features”. Finally switch on “Enable Favourites”. Once this is enabled you will see a new tab when saving a playlist (it has a star symbol) which enables you to specify favourites as your save destination.
Please note that saving tracks to “Favourite Songs” is MUCH SLOWER than saving as a playlist!
I quit Apple Music and have now lost all of my “Loved” tracks. Is there any way I can get them back?
If you suspend your Apple Music subscription for whatever reason you have only small time window to re-instate your subscription before Apple will remove your library from their databases. If you’d saved treasured playlists and favourite tracks to your library this can be extremely frustrating: they will effectively be deleted.
If this happens to you, you may be interested in this section which describes a way in which you may be able to retrieve your favourite tracks, providing that not too much time has passed. The method is easy but it does take a bit of time while you wait for Apple to do their thing. This is how you do it:
- Log-on to https://privacy.apple.com using the Apple Id that you use for Apple Music (this is very important – if you use different Ids for Apple Music & iCloud)
- Select “Obtain a copy of your data” and then “Apple Media Services information”. Then “Continue”.
- Choose a maximum file size (the minimum of 1Gb should be fine) and then “Complete request”.
- Wait. For a day or two. Or three. Keep checking back here: https://privacy.apple.com/account to see if your file is ready for download.
- Once it is ready, download your file (it is called “Apple Media Services information.zip”) and unzip it (easiest on a Mac or PC).
- Next, find the file “Apple_Media_Services.zip”, unzip it and then open the folder “Apple Music Activity”.
- Find the file “Apple Music Likes and Dislikes.csv” and put it somewhere where Playlisty can open it e.g. on a Mac leave it in the Downloads folder; on an iPad or iPhone, put it somewhere on your iCloud or DropBox drive.
- Open Playlisty, select the “Files” tab and add the “Apple Music Likes and Dislikes.csv” file. Hit “Next…” and let Playlisty do the rest.
Sorry if that sounds complicated – it really is not, but you do have to wait a while for Apple to get your data together.
Installation
I can’t sign-in to my Spotify account
Playlisty uses an industry standard method provided by Apple to connect to your Spotify, YouTube or Deezer accounts. It’s called OAuth 2 and the reason it’s widely used is because of privacy. Specifically, because we use it, there is absolutely no way that Playlisty can see your username or password at any point while you are signing-in to these services.
OAuth 2 on Apple devices uses your default browser to sign-in to the service. This usually works well but it’s true to say that some browsers are more reliable than others and occasionally even the best browsers can get a bit out of step during the OAuth 2 process. Unfortunately this is even more true if you use “Sign-in with Google”, “Sign-in with Facebook” or “Sign-in with Apple”: we have found these methods to be quite hit-and-miss when signing-in with OAuth 2.
Fortunately there are a couple of alternative methods you can use to sign-in if you are having problems with the standard “Link” button. Option 1 is for Spotify only but Option 2 should work with Deezer & YouTube too.
1. Use the “Try another way” button
When you connect to Spotify in “Playlisty for Spotify” you’ll sometimes notice an extra “Try another way” button underneath the “Link your account” button (see below).
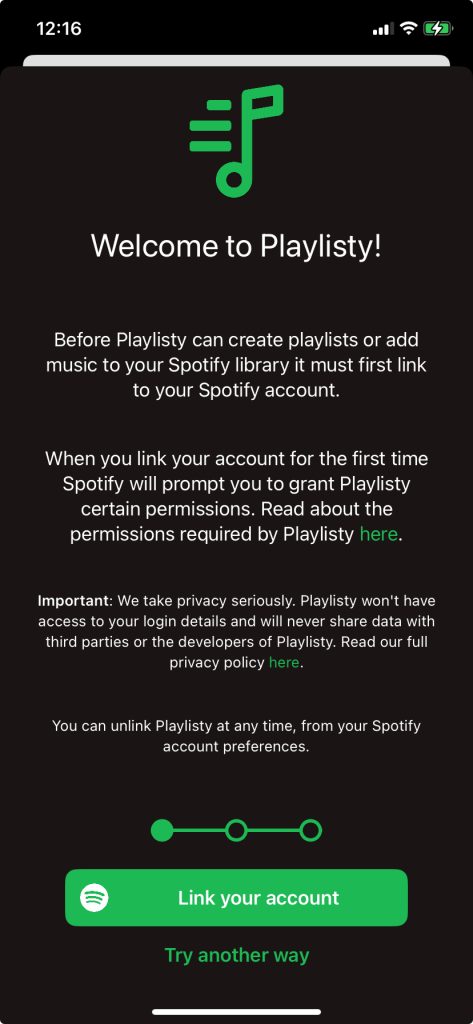
If you see this button is usually means that Playlisty has detected that you have installed the Spotify app on your device and if you tap it, Playlisty will try to use the Spotify app to sign-in instead of your browser.
2. Sign-in to Spotify in your browser BEFORE installing Playlisty
This second method works well with Spotify and is also worth trying with YouTube & Deezer:
- Close Playlisty altogether.
- Close Safari (or your default browser) altogether and then re-open it.
- Sign-in to Spotify (or YouTube or Deezer) in your browser at https://open.spotify.com (or https://www.youtube.com or https://account.deezer.com) and make sure everything looks as you would expect e.g. that you are signed-in to the account you expected. Stay signed-in.
- Open Playlisty again, and hit the usual “Link …” button. But DON’T sign-in at this point – just close the sign-in window.
- You’ll get the usual error message here from Playlisty. Just hit the “Go back” button.
- Hit the “Link …” button again. Hopefully this time your sign-in will happen automatically and you’ll be prompted to give Playlisty permission to access your library.
The reason this works is that Playlisty uses a slightly different kind of browser “session” the second time you try to connect which will pick up any pre-existing connections you’ve made. No security details get passed to Playlisty though – it all stays securely in your browser.
What are the pre-requisites for running Playlisty?
To install & run Playlisty you will need:
- To be running iOS 16.6 or MacOS 13.7: Unfortunately we use some of the latest Apple APIs, which weren’t available before these versions.
- An Apple Music subscription with iCloud Music Library switched-on.
It says that Playlisty Pro isn’t available!
Occasionally we hear of users who go to purchase Playlisty “Pro” only to find a message in Playlisty saying that it’s not available. This message happens when Playlisty asks the App Store for the list of products available to you and the App Store sends back an empty list.
Sometimes this happens because there’s an issue with your account which means you’re not currently able to make payments. However just occasionally it happens because of a glitch at the App Store.
If you are sure your account is Ok, and before calling Apple, we recommend trying the following steps:
- Terminate & then restart Playlisty
- Restart your device
If you still can’t see the option to purchase Playlisty Pro:
- Head over to Settings → [Your Apple Id] → Media & Services
- Sign-out
- Reboot your device
- Sign-back in again
- Restart Playlisty
This fixes most App Store issues!
What is “Sync Library” and why do I have to enable it?
If you enable “Sync Library” you are allowing the Music app to store your library in the cloud rather than just locally on your device. If you have multiple devices connected to the cloud they will all share the same library, so if you add a track on one device, within a few seconds all your other devices can see it too. So there’s no need to sync your devices any more – they stay up to date automatically. It’s magic.
But what if some of your devices don’t have enough room to save all of your tracks? Apple have thought of that: when a device downloads your library it doesn’t download any of the tracks themselves. It just downloads the “metadata” – the data about what tracks you have (including your playlists) which uses only a tiny amount of memory. You can then either choose yourself which tracks you want to download for offline access or let your device decide for itself. Either way you should not run out of memory. It’s very clever.
Downsides? Well, if all your devices have different stuff on them it is all going to get added to the cloud when you enable Sync Library, which means that there’s sometimes a bit of sorting-out to do afterwards e.g. some duplicates. But apart from that, there really aren’t any downsides.
What does all this have to do with Playlisty?
The answer is that for a playlist to contain an Apple Music track it MUST be in the cloud. If you have a local “non-cloud” playlist you simply can’t add Apple Music tracks to it. It’s a rule.
Which means that if you want to copy any playlists to Apple Music, however you do it you are going to need “Sync Library” switched on.
I just installed on a new device and tried to restore my purchase. It didn’t work!
Please select the section which applies to you:
I purchased playlisty pro on a mac and I’m having problems restoring on an iphone
Unfortunately we’ve been seeing this issue quite a bit recently and have escalated it to Apple. They accept that the issue is on their side: there seems to be a “break” between the macOS & iOS app stores at the moment.
Luckily a few weeks ago one of our customers found what looks like an easy fix:
“To fix the issue I’ve gone through the purchase process again on my iPhone, and as it is a non-consumable IAP there was no second payment”
I should stress that we can’t test this fix as we haven’t been able to reproduce the issue ourselves, but dozens of other customers have told us that it works and if you do get charged (very unlikely) you should be able to request a refund from Apple.
Everyone else
If you get this problem, the first thing to check is that the Apple ID you are logged-in with is the same as (or has access to, via family sharing) the account with which you purchased Playlisty. It sounds obvious but we’ve made that mistake ourselves.
If the Apple ID looks correct then the most likely reason for a restore not working is that Apple’s servers are too busy and the request is failing at their end. So the next thing to try is simply waiting a bit – an hour or two ought to be enough – and then trying again.
If that doesn’t work, you might want to consider the “repurchase” method mention in the section above (note: if you’ve purchased “Pro” you should not get charged again).
If it still doesn’t work, contacting Apple is probably your next best step. Playlisty just uses the standard Apple mechanisms for in-app purchases and whenever we’ve recommended that customers call Apple in the past, they’ve always managed to resolve it.
However we know from experience that the first couple of things that Apple recommend are 1). A reboot of your iPhone, and 2). To sign-out & of Media & Purchases on your iPhone, reboot and then sign back in again, so this is probably worth doing before you call them.
Why doesn’t Playlisty work on a child’s account & how can I work around this?
Unfortunately, Apple doesn’t allow third party apps such as Playlisty or Amazon Alexa to connect to accounts that are set up as “Child” accounts within a family sharing group.
If you want to get some playlists from a child’s Spotify account and save them to their Apple Music account, you therefore need to go through a few steps:
- Install Playlisty on an adult’s device and link it to the child’s Spotify account. If Playlisty is already installed and pointing to another Spotify account you will need to sign-out of that account first and then sign-in to the child’s account.
- Import the relevant playlists to the adult’s Apple Music account.
- Share the playlists from within Apple Music (see https://support.apple.com/en-gb/guide/music/mus140a2e93/mac).
The child user can then access the shared playlists and link / copy them as required.
What Spotify permissions does Playlisty need?
In order for Playlisty to work with Spotify you will be required to grant Playlisty certain permissions. Playlisty for Spotify and Playlisty for Apple Music need slightly different permissions but in both cases the permissions requested are required only to enable Playlisty to work, nothing more. Your data will always remain private, between you, your device & Spotify.
Here is a summary of the permissions needed by the different versions of Playlisty:
- View your activity on Spotify: Playlisty needs access to your Spotify library in order to read existing playlists. If you are using Playlisty for Spotify it will also use this permission to populate the Discovery section with your favourite or recently played artists & genres, to make it easier to find related content.
- Take actions in Spotify on your behalf: Required by Playlisty for Spotify to enable adding, editing & playing playlists and adding tracks, albums & playlist artwork to your library. These functions are what Playlisty for Spotify is all about.
- View your Spotify Account data: Only required by Playlisty for Spotify. Playing tracks requires a premium account so Playlisty needs to know the type of account you have. It also needs to know your country, to ensure it picks the right tracks for your region, and your Spotify ID, to work out which playlists in your library can be edited by you.
For more information about how Playlisty handles your data please see our privacy policy.
Sharing
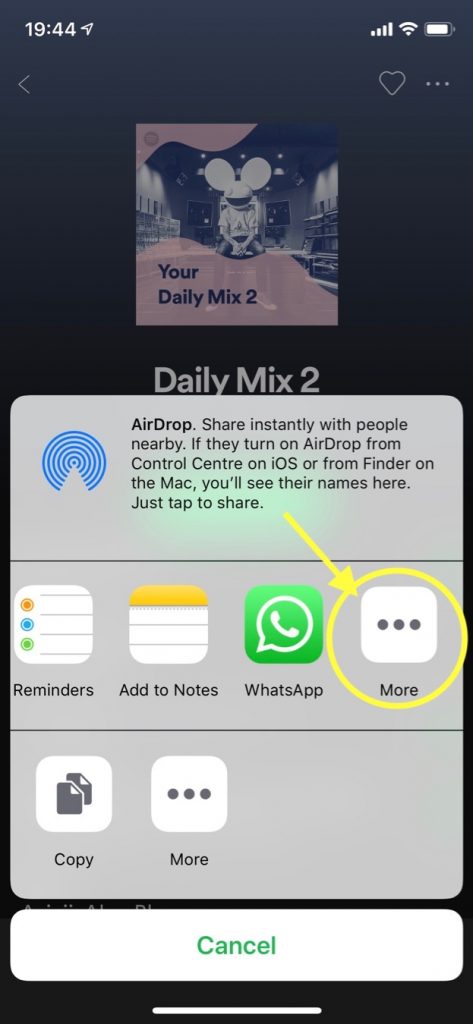
How do I “Share” a playlist from another app such as Safari?
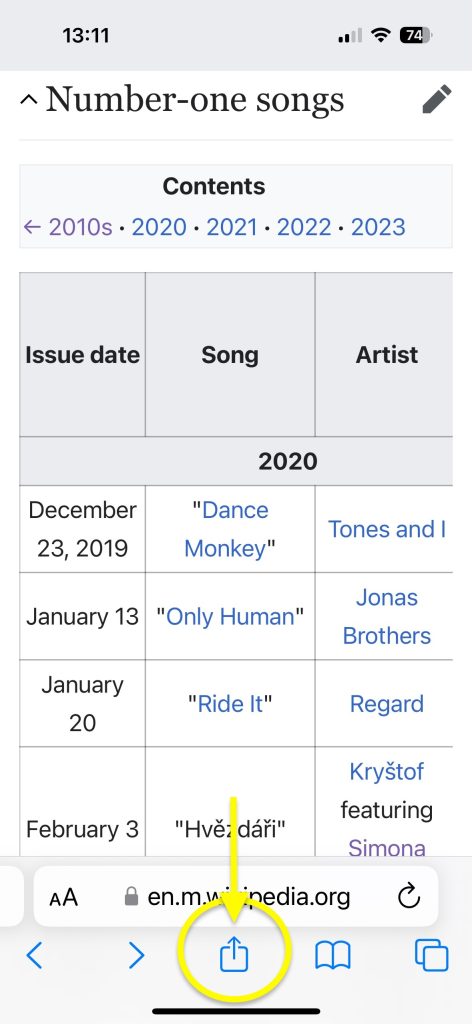
Look for the share icon, and then press it
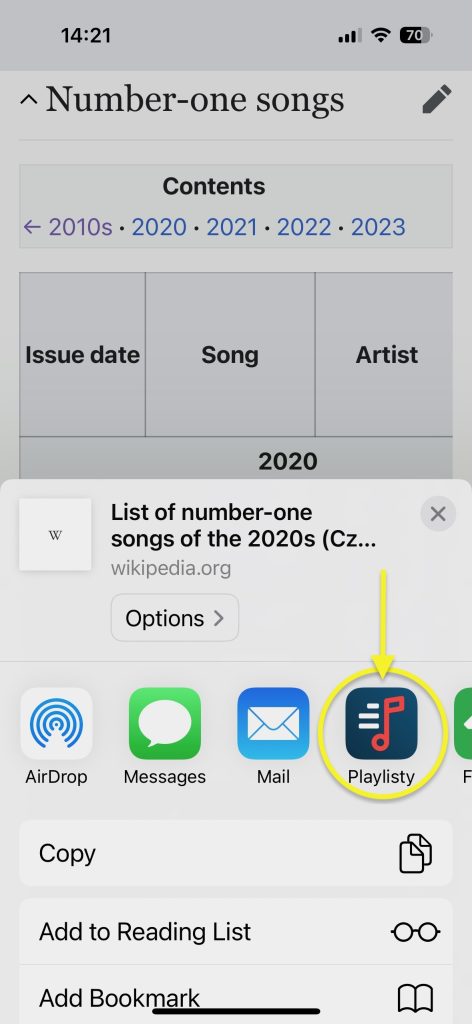
Select “Import Playlist” or “Playlisty” from the list
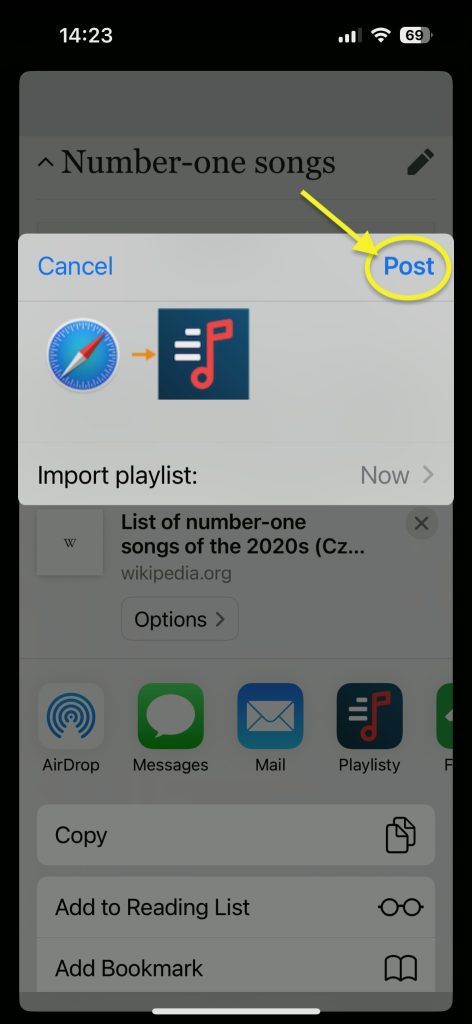
When the Playlisty “Share Extension” pops-up, hit “Post”, and then head over to the Playlisty App.
I tried importing a Podcast/Web-page and it didn’t work…
There are a couple of reasons why a playlist sometimes won’t be immediately recognised:
- Most commonly, there isn’t a full playlist available on the URL you’ve shared (Podcasts have URLs too). If you have the URL, try pasting it into a web browser and see if you can see the playlist. In quite a few apps, when you hit “Share” they give a URL with incomplete data (Spotify – limited to 30 tracks) or nothing much useful at all (Deezer, and web pages that use images for playlists or lots of JavaScript). Obviously if there’s no playlists there, Playlisty can’t do anything about it. The exception is actually Spotify: Playlisty is a registered Spotify app and talks directly to Spotify’s servers to get the information it needs.
- Sometimes there’s a playlist there but despite its advanced pattern matching technology, Playlisty just can’t find it. It’s worth cutting and pasting just the playlist text itself (without all the other text on the page) into the app – often that will work when sharing the whole page did not. If there’s a page you use a lot and it’s not working, please send it to us and we’ll try and get it working in a future release.
If all else fails, you can see the playlist but Playlisty simply won’t recognise it, try pasting it into a text file and try and clean it up a bit yourself. If you can get it in:
- Track name – Artist name
format you can be sure it will be recognised.
I’ve hit the “Share” button but Playlisty isn’t there…
Scroll to the right hand end of the list of “Share Extensions”, and select “More”.
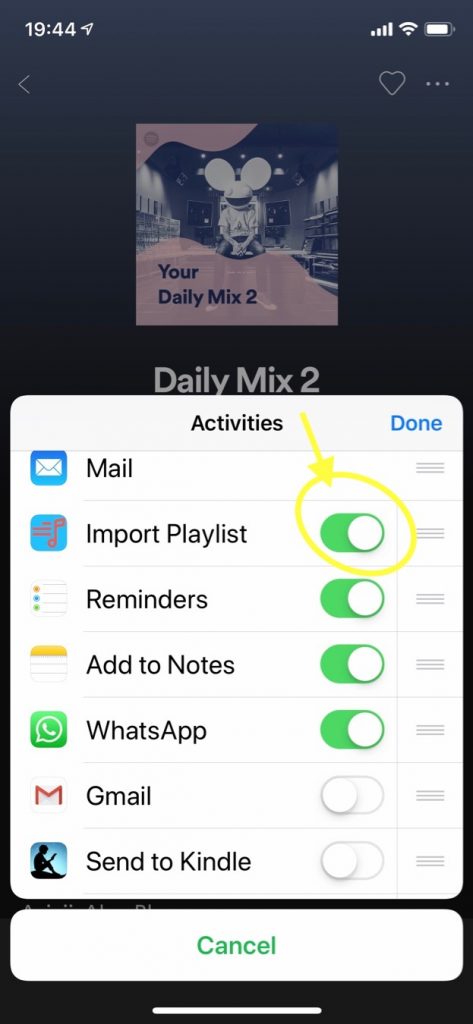
Scroll down the list until you find “Playlisty”, and then turn it on. If you want to save a bit of time it’s worth moving it nearer the top of the list as well – this will make it quicker & easier to find.
I’ve selected the Playlisty “Share” icon but I’m not getting a playlist. I’m getting nothing/garbage instead…
If Playlisty couldn’t find a playlist at a URL you shared with it, but it did find some text, it will show you the stripped-down text that it received in the hope that you can clean it up a bit and try again. This is best done by cut/pasting it into a text editor and then pasting it back when cleaned-up. Better still, save it as a text file on your iCloud/DropBox/Google drive and open it in Playlisty from there.
By cleaned-up we mean as close a possible to a list of lines, each containing “Track name – Artist name” (or the other way around – it doesn’t matter).
If you want to know more take a look at the “I tried importing a Podcast/Web-page and it didn’t work…” section.
Matching
What do those red, amber, green & blue buttons mean?

If you tap on one of these buttons Playlisty will filter your playlist to show just those items which are flagged with that colour.
Items flagged with green & blue icons have found excellent matches in Apple Music’s catalog (assuming you are using Playlisty for Apple Music). There’s nothing more you need to do with these – they will be part of your playlist when you hit “Save”.
Red and amber are the ones you need to focus on. Hopefully there won’t be many of these (if any) but the process for checking them is the same:
- Tap on the red or amber button at the top of the list and it will filter on rows with that colour.
- If you are looking at amber ones you can see how Playlisty matched each one – there’s an arrow going from what, say, Spotify had to what Playlisty found on, say, Apple Music. If you are happy with the suggested option on an amber track, do nothing and leave it as it is. It will be saved with your playlist.
- To “fix” the red rows and any amber ones you aren’t happy with, tap on the row and after a moment you should see a horizontal list of possible alternatives, if there are any.
- To fix that row simply tap on the one that looks like the best match. If there aren’t any, you can tweak the text that Playlisty is using to search for your track and press enter to search again. Note that not all tracks are available on all services.
- Then rinse & repeat with the remaining rows.
If you:
- have an amber track and you aren’t happy with the match and you can’t find an alternative
- have any other blue or green track you don’t want to include in the final version of your playlist for whatever reason
…use the Skip button to tell Playlisty not to include that track when saving the final playlist.
When you are happy, don’t forget to tap the “Save” button to start the process of actually saving your playlist.
Lots of my tracks are failing to match
The most likely reason is that you are importing classical music. Unfortunately there are so many additional factors involved in getting a perfect match (Orchestra, Conductor etc) that partial matches are as good as you can hope for on most classical tracks.
The other common reason why you might not get a match is that the track simply isn’t available in Apple Music yet.
If you think Playlisty has missed a simple match with a track you know is there in Apple Music, please send us details using the form below, and we will try to fix it!
You say you support YouTube. I just tried it on my YouTube Music account and lots is missing!
Unfortunately YouTube & YouTube Music are not the same thing, although currently Google do not provide a way to access YouTube Music data except though YouTube (or more specifically the “YouTube Data API”).
What does this all mean?
It means that sometimes you won’t be able to see some of your YouTube Music playlists in Playlisty. And sometimes you will be able to see them but they take hours or days to appear after you create them.
It also means that very frequently when you try to import a YouTube Music playlist in Playlisty it will not be able to match some or many of the tracks.
This is because much of the data about your tracks (e.g. the artist) gets stripped off as it goes through YouTube because, for example, “artist” is not a data field for YouTube videos.
We really hope that Google fix this soon.
Controlling how Playlisty matches tracks
Whenever you import a playlist, Playlisty uses sophisticated heuristics to find the optimum equivalent track in Apple Music. Usually this results in a perfect match, but it’s not uncommon for Playlisty to find several Apple Music tracks which exactly match from an audio perspective but which have different cover art and were released differently e.g. as a single (released in Spatial Audio), an album, a “best of” album and even a compilation album.
Which of those versions you’d like Playlisty to choose will depend on your priorities, and starting with Playlisty v3.2 you can now configure how you’d like Playlisty to choose between different versions of tracks.
This section is intended to provide some recommended settings based on common priorities, assuming you are using Spotify as a source. You’ll find the new options in the “Matching + Saving” section of Settings.
And remember: Playlisty will never deliberately pick a “compilation” version of a track unless it’s the only version available or unless Apple Music’s metadata is inaccurate (which happens more often than we’d like!).
Priority: “I want my Apple Music Playlist to be EXACTLY the same as my Spotify playlist”
If you spent ages getting your artwork just right on Spotify and want to keep it that way then these settings are for you. Click here to learn more about how Playlisty handles artwork. Also bear in mind that the exact track isn’t always available:
| Use Album Details | Yes |
| When matching | Prefer Singles |
| Explanation | Slavishly tries to copy what’s on Spotify but switches-off any further “album optimisation”, leaving Playlisty free to pick the best tracks for anything which didn’t match. |
Priority: “I want the best possible audio quality on Apple Music”
If you want to upgrade your Spotify tracks to the best audio quality that Apple Music has to offer then we recommend the following:
| Use Album Details | No |
| When matching | Prefer Dolby Atmos/Hi Res (delete as appropriate) |
| Explanation | Leaves Playlisty free to pick the best audio quality in all situations. Note that Playlisty will also favour Apple Digital Master tracks with these settings. |
Priority: “I want to keep my play stats as clean as possible”
If you like to keep your play counts against the same instance of each track you’ll want Playlisty to pick the most ubiquitous version available (usually the album version) when importing. We’d recommend:
| Use Album Details | No |
| When matching | Prefer Albums |
| Explanation | Steers Playlisty towards picking the original artist album version of each track, regardless of what was on Spotify, as this is usually the most widely used version. |
Priority: “I’m generally Ok with my Spotify playlists but clean them up a bit where possible”
This is our default setting and is a good overall compromise. It mostly gives you what you have on Spotify, but will tidy-up your playlist by “consolidating” where possible e.g if on Spotify you picked a couple of tracks by the same artist from a compilation album, but Playlisty sees that both those tracks are available from the same original-artist album, it will “upgrade” the tracks to the original artist versions:
| Use Album Details | Yes |
| When matching | Prefer Albums |
| Explanation | Generally gives you an accurate copy of your Spotify playlist but if you have a scattering of compilation tracks which are available from original artist albums then Playlisty will attempt to upgrade them. |
About Deep Search
Deep search is a feature introduced in Playlisty 3.6 to enable additional depth to your track searches in certain circumstances. You can switch it on or off from the “Matching & Playback” section in settings. It’s OFF by default, although when you tap on a track to see potential matches Playlisty will always perform a Deep Search so that you can see every possible option.
How does it work? When Playlisty searches for tracks it will normally keep searching until it finds a perfect match for the track you are looking for, including artwork & audio quality, and then stop searching. But with Deep Search switched-on it will carry on searching even when it’s already found a perfect match. It will search until pretty much every possibility has been exhausted in the hope that an even better “perfect” match is out there.
When would this be useful? For most tracks – especially recent tracks – enabling Deep Search will make no difference to the results of matching which is why we don’t enable it by default. However if you have tracks which have appeared on lots & lots of compilation albums (e.g. mainstream tracks from the 1980’s) enabling Deep Search will sometimes result in better quality artwork than the standard search. If artwork is important to you and you are disappointed with some matches using the normal search then we’d recommend giving Deep Search a try.
When should I not use it? Using Deep Search can be significantly slower than performing a normal search. More importantly it can use much more memory, meaning that smaller devices (e.g. iPhones) may close Playlisty down before matching is complete on larger playlists. If you are using an iPhone and Playlisty appears to crash before a large playlist has finished matching then ensure that Deep Search is switched-off.
Saving
Playlisty says it’s finished saving to Apple Music but some tracks or playlists are missing
So you’ve been through the process of matching & then saving your playlists, Playlisty said it had saved them Ok, but not all of your playlists or tracks were there when you looked in the Music app?
First of all, don’t panic: as long as Playlisty didn’t show you an error message you can be pretty sure that your playlists have been safely saved (almost always the issue is down to Apple Music itself). This section outlines the top 3 reasons it can happen and tells you how to fix it.
1. Your device is slow syncing with Apple Music
This is a common problem. By default, when Playlisty creates your playlists it creates them in Apple Music’s “cloud” and then relies on Apple Music to sync them back to all the devices logged-in to your Apple Music account. So if you can’t see some of your playlists or tracks, the most likely reason for this is that Apple Music either isn’t properly syncing to your device or it’s running slow.
If you have access to a desktop machine (Windows or Mac) you can check this by taking a look at https://music.apple.com in a browser. This is the web version of your Apple Music account and it works directly from the cloud so you should see all your playlists there even if they haven’t made it to your device.
If tracks are missing just from your device but not from the cloud, first check that Check “sync” after saving is enabled in Settings → Matching + Saving. Also (and this one sounds a bit weird) pick one of your playlists and copy a link to it (Share Playlist → Copy). Then paste that link into Safari and check it takes you to the right playlist. This frequently unblocks sync issues.
If you are still seeing this problem then there are 2 potential fixes, both of them easy:
- Wait a bit. Often if you just leave Apple Music for a few minutes (or even better, an hour or two) your playlists will suddenly appear. Similarly if you synced a big playlist and you can only see some of the tracks, wait a bit and the rest will usually turn up.
- Force a full re-sync. If you’ve waited a while and there’s still no sign of your playlists then there might be something holding up the sync on your device and triggering a full re-sync is the next step.
To force a full re-sync of your device you can go in to your Apple Music settings and:
- Turn-off “Sync Library” (Settings → Music on an iPhone or Music → Settings → General on a Mac)
- Wait a few minutes. Make sure it stays off – sometimes it pops back on by itself!
- After a couple of minutes turn it back on again and after a while all of your playlists will re-sync back to your device, including the ones Playlisty created.
2. Your device is filtering explicit tracks
If you can see your playlist Ok but some of the tracks are inexplicably missing, this is the most common cause. It’s an easy thing to check:
- Go to Settings → Screen Time → Content & Privacy Restrictions
- Go into Store, Web, Siri & Game Center Content
- Ensure that Music, Podcasts, News, Fitness are set to Explicit
If you don’t set this to Explicit, Apple Music will hide all explicit tracks from you.
3. You are looking in the “Downloaded” section of your library
We’ve made this mistake many times ourselves: on an iPhone/iPad, if you go to the Library tab of Apple Music and tap on the “Downloaded” section of your library you will get a view of your library which is filtered to show only items which have been downloaded to your device for offline listening. In other respects it looks just like your library and it has it’s own Playlists section so it’s easy to mistake it for a view of your library. Problem is, none of your Playlisty playlists will appear in this section unless you explicitly asked Apple Music to download them.
So if your Playlisty playlists are missing, make sure you are looking in the right playlist section!
How does the “Add to existing playlist” function work?
Say there’s a playlist that gets regularly updated on an external service such as SoundCloud or Spotify e.g. perhaps a friend shares their favourite tracks in an “On Deck” playlist which they add to each week.
Suppose you want a playlist in your Apple Music library that gets updated with any new tracks that appear in that their “On Deck” playlist.
That’s what the “Add to existing playlist” (aka “Add Mode”) function is useful for: each time you import “On Deck” with Add Mode switched-on, instead of simply creating a new playlist (e.g. “On Deck (2)”) Playlisty will compare the Spotify version of “On Deck” with the version in your Apple Music library and it will add any new tracks to the end.
Also, if you don’t want to have to remember to do the sync every week you can setup a Siri Shortcut to do this for you, using the “Add to Siri” button on the final “Save” screen, and then creating an “Automation” in the Apple shortcuts app. For more details on how to use Playlisty within Siri Shortcuts, click here.
What’s the difference between “Save to library” and “Save to playlist”?
“Save to playlist” does what it says: it saves the tracks you’ve selected to a playlist.
“Save to library” will not save the selected tracks to a playlist. Instead it will save them to your cloud library and you’ll be able to see them by looking in Library -> Songs. Note that there is no specific order for “Songs” – you can sort them into whatever order you want.
Generally if you are not sure which you want, choose the Playlist option. If you later decide that you want to add them to your library this is easy to do after the event using the Music app itself.
What’s the difference between “Save to new playlists” and “Save to your library ‘as is’”?
“Save to new playlists” will save whatever playlists you’ve selected to new playlists, including your “Liked Songs” and “Liked Albums”. Or in other words:
- Playlists -> Playlists (with same names)
- “Liked Songs” -> a “Liked Songs” Playlist
- “Liked Albums” -> a “Liked Albums” Playlist
If you are not 100% familiar with Apple Music then choose this option – it is simplest to understand, and if you want to move the tracks in a playlist to your library at a later time it’s easy to do in the Music app.
“Save to your library ‘as is’” will save Playlists as Playlists but will transfer Liked Songs & Albums (if selected) direct to your library. Or in other words:
- Playlists -> Playlists (with same names)
- “Liked Songs” -> the “Songs” section of your library
- “Liked Albums” -> the “Albums” section of your library
This will copy your Spotify library (for example) over to Apple Music in the way which is closest to how you see things in Spotify.
Why is Playlisty telling me my Apple Music playlist is read-only?
There are certain playlists that can’t be updated by Playlisty because Apple Music says they are “read only”.
The usual reason for this is that you’ve marked the playlist as “Collaborative”. Unfortunately Apple doesn’t currently allow third-party apps such as Playlisty to update collaborative playlists.
Smart playlists, playlist folders and playlists owned by other users which you’ve linked to your library are also usually marked as read-only.
How can I use Playlisty to backup my Apple Music playlists?
Starting with Playlisty 3.1 you can save your Apple Music playlists to a file and then restore them later using the “Files” tab.
Important: only Apple Music tracks will get backed up using this function. If your playlists contain your own local tracks they will NOT get backed up!
To backup your playlists:

- Navigate to the “Files” tab in Playlisty and then select the hard-disk icon from the picker at the top-right of that screen. You should be able to see a tree view of all of the playlists in your library.
- Select the playlists you want to back up and tap “Next…”
- Playlisty will then go through a “Reading” phase where it retrieves all available identifiers for the tracks you’ve selected. Once reading is complete, hit “Save” as you normally would. Note: it’s not worth “fixing” any tracks which have not matched at this point. All tracks will be written to your archive file – regardless of whether they matched – and if any need fixing you’ll be able to do that when you import them later.
- When the “Save to Apple Music” screen pops-up you’ll see a new “Save to a file” tab. Select this and tap “Start”.
- You’ll be prompted for a location to save the resulting file.
- That’s it! Playlisty will create a .plif (PlayList Interchange Format) file at the location you selected.
To restore your playlists:
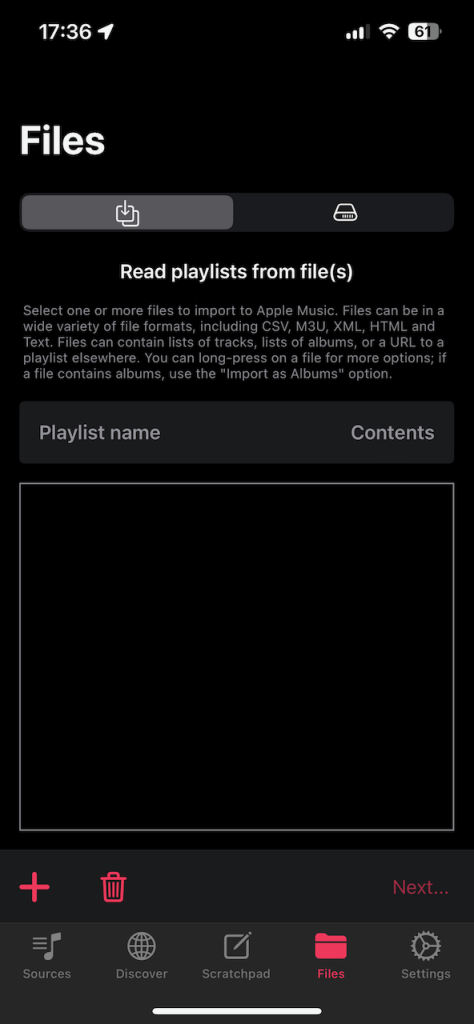
- Navigate to the “Files” tab in Playlisty and then select the download icon from the picker at the top-left of the screen. Use the ‘+’ button to add the .plif file you created earlier. Hit “Next…”
- Once reading is complete you will have the opportunity to select the playlists you want to restore from the .plif file by checking/unchecking the “Save?” checkbox next to each. If any tracks need “fixing” you should do it here.
- Hit “Save” and save the selected playlists to your Apple Music library as you normally would.
What exactly gets backed up?
If you save one or more playlists with this function, the playlist metadata (name, description, curator1) and tracks (name, artist, album & identifiers, where available) will be written to the resulting file.
This means that if you immediately restore the playlist to an account in the same geographic region then the restored playlist should be an exact copy of the original apart from the playlist artwork (unfortunately it’s not currently possible to back this up).
If, when you come to restore the file, some of the tracks are no longer available (e.g. because they have been removed from the catalog or you have moved to a different region) Playlisty will attempt to find the best possible matches for these tracks at that time.
1Please note that curator will not correctly populated until Apple make it available in a future release
What are PlayList Interchange Format (PLIF) files?
PLIF files are open standard files containing a definition of your playlists in JSON data interchange format. Each file can contain any number of playlists and there are a multitude of tools (other than Playlisty) which you can use to explore and extract data from them, should you wish.
To get you started we’ve published a script written in the Python language which will extract all playlists from a PLIF file and write each to a separate CSV file which you can open in a tool such as Excel. The script can be found here: https://github.com/playlisty/extract_playlists.
Advanced
Can I import a list of albums?
Album mode is one of Playlisty’s more advanced features. In summary, if you give Playlisty a list of albums, it can explode the albums into individual tracks before saving them to your library.
Sometimes Playlisty will use album mode automatically, behind the scenes. For example, if you select the “Spotify Liked Albums” playlist from your Spotify library and transfer that to a playlist in your Apple Music library, Playlisty will know that in Apple Music playlists cannot contain albums and it will therefore explode all those albums into tracks for you automatically. Note: if you select your library as the destination, rather than a playlist, Playlisty is able to add the albums as albums rather than tracks.
But sometimes it’s handy to be able to invoke this functionality yourself, and this section describes 3 ways you can get Playlisty to treat a list as a list of albums not individual tracks.
- Include “.albums” in the filename. If your list is in a file and you import it from the “Files” tab, Playlisty will automatically use album mode if the filename contains “.albums” e.g. “favourites.albums.csv”.
- Switch it to albums mode in the Files tab. If you add a file containing albums to the Files tab and long-press on it (right-click on a Mac) you will see an option to “Import as albums”. Select this.
- Include the query parameter “playlisty_query_type=albums” on the URL. This option can be used here you are pasting a URL to a web-page into the Scratchpad. For example pasting the URL “https://en.wikipedia.org/wiki/Billboard_200?playlisty_query_type=albums” will enable Playlisty to correctly process the list of albums contained on that page (the first table).
How do I use Playlisty with Siri Shortcuts?
Shortcuts provide powerful task automation capabilities across iOS, iPadOS & macOS devices and they are fully supported by Playlisty. If you’d like to be able to:
- Tap an icon to automatically import & start playing a YouTube chart
- Schedule a daily task to synchronise your favourite Spotify playlist with Apple Music
…then Shortcuts are for you. This section is a technical guide for those with an understanding of the basics of Shortcuts and who want to get the most out of Playlisty. If you’d like to learn about Shortcut basics then we suggest looking elsewhere before continuing here.
You can create a Playlisty Shortcut from within the Shortcuts app itself or (if you are using Playlisty Pro) by tapping the ”Add to Siri” button in Playlisty. See the video below for more details.
Note: after creating a Shortcut we strongly recommend you turn-off the Playlisty parameter “Show when run” from within the Shortcuts app (it’s actually not part of Playlisty – it’s added by the Shortcuts app itself).
Shortcut Actions Supported
Playlisty supports 2 Shortcut actions:
- Import Playlist: This is how you kick-off a playlist import. The easiest way to configure an “Import Playlist” action is to use the “Add to Siri” button on the “Save Playlist” screen in Playlisty. Often that’s all you’ll need to do, but if you want to fine-tune your import please take a look at the shortcut parameters section below. One point to note: when using “Import Playlist” it will return to you the name of the playlist as an output and it will do so as soon as it knows it. This is usually very quickly, and long before the playlist has actually been imported. “Import Playlist” returns quickly so that you can get on with other tasks in your shortcut if you need to, but your shortcut should not assume that the playlist already exists at this point.
- Check imports have finished: This action outputs a true / false boolean value to tell you whether the previous “Import Playlist” command has completed its background processing. If the previous import has completed it will return immediately but if processing is still going on it can take up to 5 seconds to complete. If you wish to import larger playlists in the background then use of the “Check imports have finished” command is essential: you should call it repeatedly (we recommend around 30 times) after an “Import Playlist” command in order to give the Import Playlist enough time to finish importing.
Background vs. Foreground
Shortcuts can invoke Playlisty to perform a playlist import in 2 different modes:
- In the foreground. In this mode, Playlisty will pop-up on screen and start matching the playlist you specify automatically, but will then stop and allow you to take control. Useful if you want to preview a playlist before deciding whether to save it.
- In the background. In this mode you won’t see Playlisty at all unless an error occurs and Playlisty needs to notify you. The playlist import itself will happen quietly in the background.
You can change the mode using a switch within the “Import Playlist” step of your shortcut, see Parameters section below.
Note: If you are using Playlisty in the background it’s important that you periodically check your notification centre for Playlisty messages as this is how you will find out if there have been any problems. In fact we strongly recommend that you tweak your Playlisty notifications (in the Settings app) to enable sounds, badges, banners & lock screen notifications so that you find out about issues immediately. Playlisty will not send you unnecessary notifications.
Finally, if you are using Playlisty in background mode to import larger playlists (250+ tracks) there is an additional step you will need to take. For details, see the next section.
Importing large playlists in the background
Apple implement some strict controls on apps which do background processing in order to stop errant apps from draining the battery of your phone. This is a good thing but it means that whilst importing, say, a 250 track playlist in the background will work fine, importing a 350 track playlist probably won’t. Instead, you will get a notification after 30 seconds or so telling you that the playlist import failed because iOS stopped the task.
The Playlisty “Check imports have finished” command can be used to get around this restriction. Each time your shortcut calls this command it can “lend” a few more seconds background processing time to the previous “Import Playlist” command, giving it a bit more time to finish. You will typically use it in a repeat loop after your Import Playlist command, like in this example which will silently import your Spotify liked songs to an Apple Music playlist called “Spotify Liked Songs”:
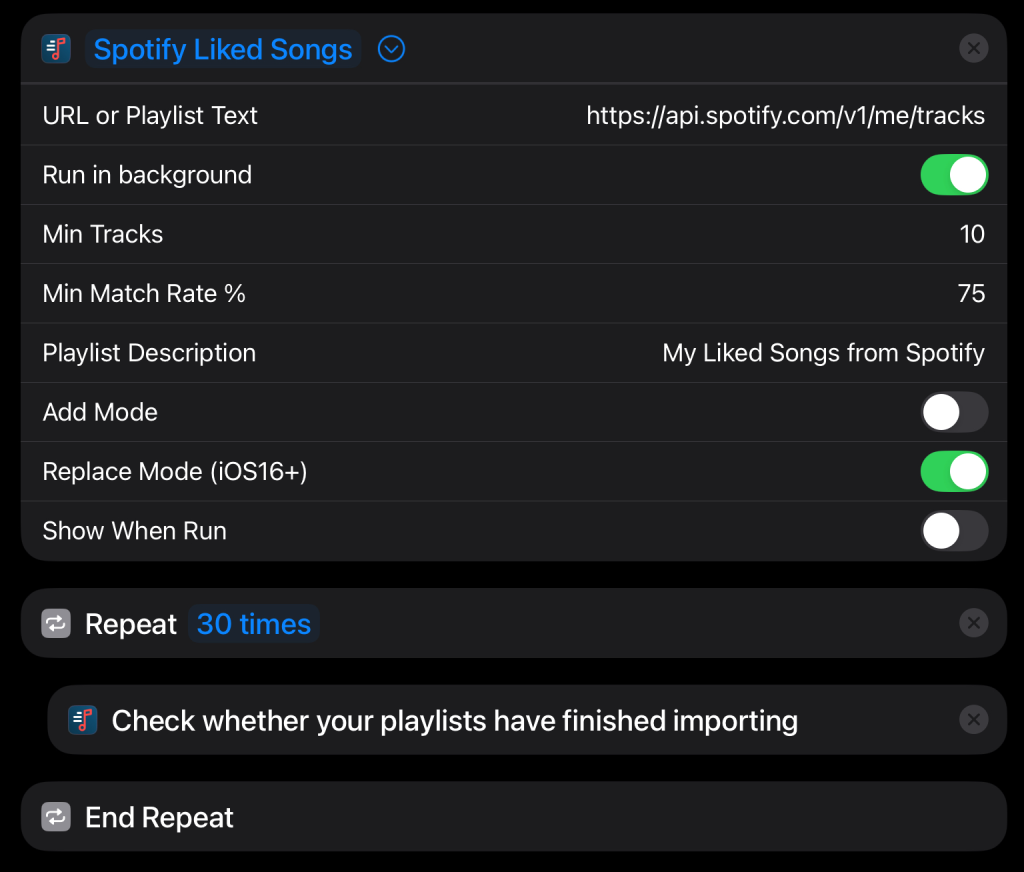
Feel free to tweak the number in the Repeat loop but we find that repeating 30 times should give Playlisty enough time to import even very large playlists; e.g. we’ve successfully imported playlists with more than 6,000 rows using this value.
Also when running a background shortcut you MUST turn off the Playlisty ”Show when run” parameter (using the Shortcuts app) as this will stop the Shortcut from reaching the ”Check imports have finished” step.
Note: if you already have shortcuts that use the “Check imports have finished” action and were created for an older version of Playlisty (2.21 or before) then they should still work fine. However we strongly recommend making the following 2 tweaks:
1). Remove any “Wait” actions in your shortcut. The “Check imports have finished” will now automatically wait if needed. Extra “Wait” actions are un-needed and will reduce performance.
2). Increase the number of repetitions. As above, we recommend repeating the “Check imports have finished” command 30 or more times as that should be sufficient for even very large playlists. Really there’s no downside to using a large number here – if there’s nothing to do, the repeats will finish almost instantly.
Parameters
Here are some of the parameters you can tweak in the Import Playlist action:
- Playlist Name (unlabelled first field): You can force Playlisty to store the playlist with a specific name by filling in this field. If you leave this blank, the default name for the playlist will be used. If an existing playlist is found with the name you specify, Playlisty will add a number in brackets to the end of the playlist name e.g. “My Playlist” becomes “My Playlist (1)”. The actual playlist name that Playlisty uses will be sent to you as an output for you to use later in your Shortcut, should you need it.
- URL or Playlist Text: A URL can be something like https://music.youtube.com/playlist?list=RDCLAK5uy_l2zLaMIWOqWSePvTSmt49GcuR8460ZR10 or https://open.spotify.com/playlist/37i9dQZF1DXdPec7aLTmlC?si=eTlo8kQFR2Wn3SJmdHH7sA.
However you can also grab text yourself (e.g. using the “Get Contents of Web Page” Web Request) and pass this in to Playlisty as raw text. Playlisty will then use advanced pattern-matching techniques to try and find a playlist within the text you passed in. - Run in background: Normally Playlisty guides you through the process of importing a playlist. However with this option checked Playlisty will attempt to import your playlist completely in the background, fully automatically. In order to do this you need to supply a few additional parameters, as follows…
- Min Tracks: This is a number. If Playlisty fails to find at least this number of tracks at the URL you specify (e.g. because the playlist is no longer there) it will stop the import and let you know. For example if a playlist is usually about 100 tracks long you might set this value to around 90.
- Min Match Rate %: This is a number between 1 and 100. If Playlisty fails to find a match for at least this %age of the tracks at the URL you specify (e.g. because the page is corrupt in some way) it will stop the import and let you know. Normally this will be set to around 75% or 80%, but if it’s a classical music playlist you might want to choose a lower number.
- Playlist description: This field allows you to specify the description that Apple Music will display below the playlist title.
- Add Mode: This maps to the “Add to existing playlist” option when saving a playlist in the app. When on, the source playlist will be scanned for new tracks which will then be added to the end of the destination playlist. When off, a new playlist will be created each time (with a new name if the playlist already exists).
- Replace Mode: This maps to the “Replace existing playlist” option and is only available on iOS devices running iOS 16 or later. When on, the contents of the destination playlist will be replaced by the contents of the source playlist, ensuring that any new tracks or deletions get mirrored across. If you’ve shared a link to the destination playlist it will continue to work: anyone using the link will see the new, updated contents. Note: “Replace Mode” only works on playlists that were created on a device that already had “Replace Mode” enabled at time of creation.
How to use Playlisty to import FROM your Music library TO your Music library
Playlisty has the ability to import playlists FROM your own Music library, back into your Music library. Why on earth would we do this? The answer is that, in many cases, passing a playlist already in your Music library through Playlisty’s advanced track matching algorithm can make it better.
How is this possible? Well starting in July 2021 Apple Music started offering lossless & high-definition versions of most of its catalog. This means that if:
- your playlists contain references to hundreds of your own treasured music files, carefully ripped from CDs;
- you’ve got some random greyed-out Apple Music tracks;
- some of your Apple Music tracks were (unbeknownst to you) sourced from compilations;
- some of your Apple Music tracks were sourced from Radio shows (easily identifiable because you will hear a DJ talking over the start and/or end);
…then better quality versions of these tracks may now be available in the Apple Music catalog.
If you rely on your weekly New Music mix to find new tracks for your playlists, then the latter two issues can be particularly annoying. Apple’s algorithms tend to favour radio & compilation versions of songs, probably because they get played the most.
Unfortunately it’s not technically possible to search Apple’s catalog to specifically find versions of songs which offer the highest quality. However Playlisty uses advanced heuristics to scan the catalog for the versions most likely to have high definition versions. Often these will also offer the best quality artwork too.
So by opening an existing Music playlist in Playlisty and either playing it directly or by saving it to a new playlist, there’s a good chance you’ll end-up with improved versions of many of the tracks.
To enable this feature you need to add your Apple Music library to your list of sources. To do that:
- Head over to Settings and find the “Apple Music as a Source” section and “Enable your local library as a source on the ‘+’ menu”
- Enable “Re-match Apple Music tracks when importing”
- Head back to the Sources tab and add the new “Your Apple Music Library” source to your list of sources
You can then browse & “import” Apple Music playlists just as you would playlists from any other source.
If you give it a try, please let us know how you get on. We’re continually looking for ways to improve our catalog matching algorithms and your experiences will help us make further improvements.
About Playlisty “Replace Mode”
TL;DR
Playlisty “Replace Mode” enables you to mirror a playlist from other platforms (e.g. Spotify) to Apple Music. So if you re-order or delete tracks from the source, those changes will be mirrored to an Apple Music playlist whenever you sync using “Replace mode”.
For technical reasons “Replace mode” is not currently available on Macs.
To enable “Replace mode”:
- Scroll to the Bottom of the Playlisty Settings page
- Go in to Advanced → Experimental features
- Toggle the switch to enable Replace mode
Replace mode will then appear as a new sync option when you save a playlist.
If you’d like to mirror a playlist from a service such as Spotify automatically, you can do this by scheduling a replace mode sync to run on a regular basis. Take a look at our guide to using Playlisty with Siri Shortcuts to learn how to do this.
Note: “Replace mode” will only work on playlists you originally created using “Replace mode”.
Background
Since the earliest days of the iPhone, Apple has only allowed 3rd party apps to do 2 things to your playlists: 1) Create them, and 2) Add new tracks to them. That’s it. No deleting of playlists, no removal of tracks or amending the order, no updating of playlist names or descriptions. And definitely no artwork.
It’s been that way for 15 years and over that period we developers have given Apple plenty of feedback that that we’d like to do more.
Well starting with iOS16 & iPadOS16, we can: Apple introduced a couple of new functions at WWDC22 which finally allow us to amend some of the attributes of playlists, including descriptions and (crucially) tracks.
Being able to truly mirror the contents of a playlist from a service such as Spotify to an equivalent Apple Music playlist is one of our most commonly requested features, the idea being that you could simply run a sync each week and any track deletions, order changes or new additions on the Spotify side would automatically be reflected on the Apple Music side.
The Playlisty team have been working hard since the WWDC announcement in June to make this possible, and the result is a new kind of sync called “Replace Mode”.
This is a big change and rather than giving it to everyone at once we are making it available to users on an “experimental” basis, starting with Playlisty v2.24. This means that:
- We don’t claim it works in all scenarios and if it doesn’t work for you, please let us know about it ASAP (please don’t expect that we’ll immediately know how to fix it!). The new mode won’t do anything horrible to your music library or playlists but the occasional crash is a real possibility and you might get the occasional error.
- If you do get an error, please wait a bit and try again before contacting us. Most errors are related to syncing between your device & the cloud; waiting 15 mins or so usually resolves them.
- It won’t work on old playlists. Apple actually gave us new functions to create playlists, as well as amend playlists, and the new amend function will only work on playlists that were created with the new create function. In practice this means that “Replace Mode” only works on playlists which were created with Playlisty 2.24 or later and when “Replace Mode” was switched-on in settings at the time.
- The author of any playlists you create this way will be “Playlisty” by default, although you can override this in Settings.
- The progress bar while saving playlists is gone. The new methods from Apple don’t give us a way to track progress so unfortunately there’s nothing for us to show you.
Honestly most of the time we find this new feature works pretty well. And once you’ve successfully created a “Replace Mode” playlist we rarely have any further problems with that playlist: subsequent attempts to update these playlists usually go smoothly. We hope that’s true for you too.
What formats does the Playlisty Scratchpad understand?
The Playlisty Scratchpad is a powerful tool which enables you to create playlists from fragments of text, web pages and URLs. For example, if you copy the following text into the Scratchpad and hit “Next…”, Playlisty will create a playlist for you:
Grow’ ft. Leo Stannard (Original Mix) - Kidnap
Rainbow - Chicane
When The Lights Are Out (Late Night Mix) - Maceo Plex
Always (Tinlicker Remix) - Above & Beyond feat. Zoë Johnston
Lots of characters apart from ” – ” are supported as the artist / track name separator – just make sure there’s only one separator per row.
The following, with artist name first followed by track name, will work just as well:
Kidnap - Grow’ ft. Leo Stannard (Original Mix)
Chicane - Rainbow
Maceo Plex - When The Lights Are Out (Late Night Mix)
Above & Beyond feat. Zoë Johnston - Always (Tinlicker Remix)
CSV formats work too. Playlisty recognises hundreds of specific comma & tab separated formats but will try and work out the right columns to use even if it’s a format it’s never seen before:
1,"Caramel Prisoner","Air"
2,"Don't Take Your Love Away (92 Mix)","Groove Armada"
3,"Eple","Röyksopp"
4,"Right Through You","Alanis Morissette"
m3u format also works nicely:
#EXTM3U
#EXTINF:186,Untrust Us - Crystal Castles
/Users/Shared/iTunes Music/Music/Crystal Castles/Crystal Castles/01 Untrust Us.m4a
#EXTINF:258,Crimewave - Crystal Castles
/Users/Shared/iTunes Music/Music/Crystal Castles/Crystal Castles/03 Crimewave.m4a
#EXTINF:366,Magic Spells - Crystal Castles
/Users/Shared/iTunes Music/Music/Crystal Castles/Crystal Castles/04 Magic Spells.m4a
#EXTINF:252,Air War - Crystal Castles
/Users/Shared/iTunes Music/Music/Crystal Castles/Crystal Castles/06 Air War.m4a
#EXTINF:210,Courtship Dating - Crystal Castles
/Users/Shared/iTunes Music/Music/Crystal Castles/Crystal Castles/07 Courtship Dating.m4a
You can also paste in a URL to a playlist:
https://music.youtube.com/playlist?list=PLywWGW4ILrvpqqkgKRV8jpZMaUPohQipPOr a URL to an album or individual track:
https://open.spotify.com/album/6EXTdWxfhHMjUbbUfBpWqU?si=bSFb5NgTR82RgbvHWUqafwPlaylisty can also handle links to many web pages. For example, if you paste the following link, Playlisty will scan the page to look for anything that looks like it might be a playlist:
https://en.wikipedia.org/wiki/List_of_Billboard_Hot_100_number-one_singles_of_the_1980sIt can even handle several URLs in one go:
https://xmplaylist.com/station/pandoranow
https://xmplaylist.com/station/siriusxmchill/most-heard
https://xmplaylist.com/station/thepulse/newest
And if there’s a format you think we really ought to support, please let us know!
What file formats can Playlisty read?
The Playlisty “Files” tab is one of Playlisty’s most powerful features. From this tab you can add any number of playlist files in a huge variety of formats, including files containing URLs, Comma & Tab separated tracks, M3U, XML, HTML and Text.
Specifically:
- Any format supported by the Playlisty Scratchpad is also supported as a file format. You can see the formats supported by Scratchpad here.
- Files can contain either tracks or albums. To tell Playlisty to match against albums not tracks , look here.
- Playlisty’s open PLIF (“PLaylist Interchange Format”) file format is fully supported and can be imported from this tab. To see how to create PLIF files, look here.
- Playlisty can import a number of file format specific to Apple Music, including Xml format and “Loved Track” data stored in your Apple Music privacy archive. Look here to find out more.
Contact Us
If your issue isn’t covered by our FAQ, please don’t hesitate to contact us. You can also email us directly using the “Contact Us” button on the Playlisty preferences screen.
Also, if there’s a web page, app or podcast you’d like us to support in Playlisty please get in touch using the form below and send us the details (including URL if possible). We’ll do our best to add it to an upcoming release